To test your view before installation, we can start by using masking tape to outline the area we want to see. Keep the tape up for at least 24 hours and mark the height of the view center on the wall. Next, we might use painter’s tape for temporary mounts, ensuring surfaces are clean and dry. Finally, we should conduct walk tests from various angles to check for potential obstructions and assess natural light. Additional strategies and insights can enhance our approach.
Key Takeaways
- Use masking tape to outline the desired view area and assess visibility for at least 24 hours.
- Temporarily mount items with painter’s tape for non-damaging adherence and better alignment.
- Conduct walk tests to evaluate sightlines from various positions and identify potential obstructions.
- Take photos from different angles to compare and document view characteristics during assessments.
- Adjust plans based on feedback from tests and document modifications for future projects.
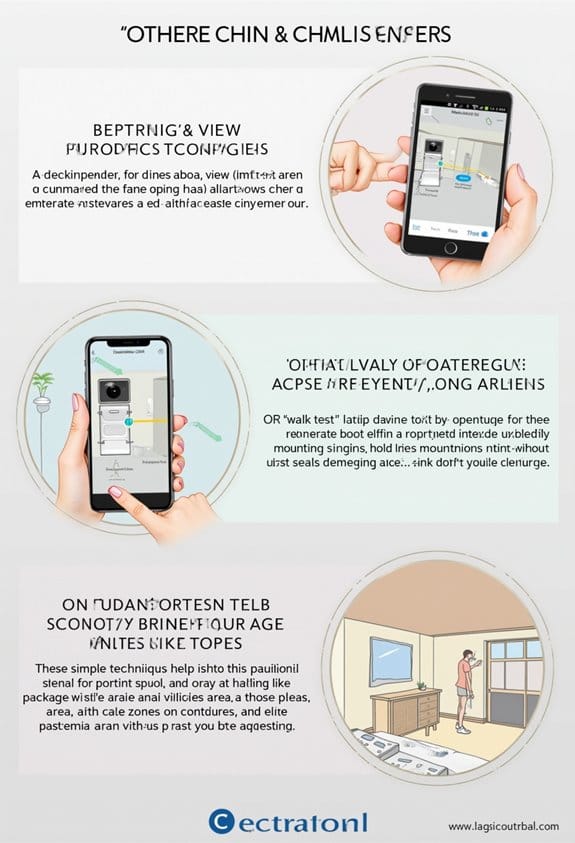
Why Testing Your View Matters Before Installation

When we consider the importance of testing our view before installation, we realize it can prevent unnecessary errors down the line. Proper view optimization is essential for ensuring that our installed items function effectively. By temporarily mounting equipment or using tape to visualize placements, we can assess visibility and make adjustments based on real-world observations. This method helps us identify potential installation mistakes before they become permanent. Conducting walk tests allows us to change our perspective, making sure nothing blocks our intended view. Taking the time to test our view ultimately enhances satisfaction with our installations, reducing the chances of costly alterations or replacements later on. Let’s focus on getting it right the first time to save frustration and money. Considering features like field of view ensures that the camera placement covers all necessary angles for comprehensive monitoring.
How to Use Tape to Test Your View

How can we effectively use tape to test our view before installation? First, we should use masking tape to outline the dimensions of our desired view area on the wall or window. This visualizes how our installation will fit into the space. Next, let’s keep the tape in place for at least 24 hours, allowing us to assess the view at different times of day and in varying light conditions. We can mark the height of the center of the view on the wall with tape to confirm it aligns with our eye level for ideal viewing. Finally, taking photos from various angles will help in our view assessment, allowing us to compare and make an informed decision before committing. Additionally, considering the placement under eaves in heavy rain or snow areas can protect outdoor devices during installation.
Effective Techniques for Temporary Mounting

Temporary mounting techniques provide us with a practical way to visualize and test the positioning of installations before finalizing our choices. Using painter’s tape is an effective method; it adheres well without damaging surfaces. For a clean outcome, we should guarantee the area is clean and dry. Clear tape can be beneficial for visual alignment, as it allows us to see underneath without obstruction. When positioning, it’s essential to mark where the temporary mount will go, as this helps with accuracy. After completing our tests, documenting results through photos and notes will let us compare different positions. This process can feel tedious, but it’s important to ascertain we’ve chosen the best spot before any permanent installation occurs. When planning your installation, consider using the recommended wire gauge to ensure a safe and effective connection.
Conducting Walk Tests for Better Sightlines
To guarantee we achieve ideal sightlines, we should conduct walk tests throughout the space we’re considering for installation. During these tests, we’ll physically move around to assess visibility from various perspectives and distances. This sightline analysis helps us in obstacle identification, pinpointing any items that may block views after installation.
We can test at different heights or angles to replicate user experiences, verifying our designs remain effective. Additionally, it’s wise to conduct walk tests at different times of the day to observe how natural light affects visibility. As we document our observations, we’ll gather essential insights that can inform necessary adjustments before final installations take place. All of this verifies our efforts will be successful and visually effective. Using tools made from industrial-grade S2 steel ensures durability and reliability during the installation process.
How to Adjust Your Installation Based on Feedback
Adjusting our installation based on feedback is essential for ensuring ideal performance and user satisfaction. First, we should collect responses from our tape tests, temporary mounts, and walk tests. This helps us identify significant concerns regarding aesthetics or functionality. Next, conducting thorough feedback analysis allows us to understand user preferences concerning placement, visibility, and usability. Observing real-world interactions during walk tests can highlight accessibility issues. We must then implement necessary modifications based on this feedback, ensuring the final installation meets users’ expectations effectively. Finally, we should document all changes made, creating a reference guide for future projects. This streamlines our adjustment process and helps avoid similar frustrations in the next installations. Additionally, considering Wi-Fi connectivity requirements during testing ensures seamless integration and optimal performance of the installed system.
Frequently Asked Questions
Can I Reuse Tape for Different Testing Locations?
Like a fragile bridge, tape’s durability can fade with each use. While it may hold initially, its adhesive effectiveness diminishes over time. We shouldn’t risk our projects by reusing tape for different testing locations.
What Materials Work Best for Temporary Mounts?
For temporary mounts, we prefer lightweight adhesive options like double-sided tape or removable putty. These mounting techniques guarantee a secure hold while allowing easy adjustments without damaging surfaces or leaving residue behind.
How Long Should I Conduct Walk Tests?
We should conduct walk tests for at least 15 to 30 minutes to guarantee peak testing. This duration helps us assess the desired duration for comfortable viewing and identify any adjustments needed for our setup.
Is It Safe to Mount Heavy Items Temporarily?
Yes, it’s generally safe to mount heavy items temporarily, but we should always consider weight capacity and take temporary safety precautions. Ensuring proper support minimizes risks and helps maintain a safe environment for everyone.
What if I Can’t Visualize the View While Testing?
If we can’t visualize the view, let’s embrace alternative visualization techniques. Through creative brainstorming, we can sketch ideas or use objects to represent what we imagine, helping us picture the final outcome more clearly.


